Oh, you know those moments, right? When a craving hits HARD, and you just *need* something sweet, but then the guilt kicks in because you’re trying to be good? I used to be there all the time! That’s exactly why I set out to create these absolutely divine Healthy No-Bake Oreo Cheesecake Bites. They’re my little secret weapon for those sweet-tooth emergencies that won’t derail your whole day. I remember one lazy Sunday afternoon, friends were coming over for a movie marathon, and I was determined to make something special that wouldn’t leave us feeling like we’d eaten a brick. As I was whipping these up, the kitchen filled with that amazing chocolatey smell, and honestly, I was buzzing with excitement. When we all took that first bite together, pure joy! Seeing everyone gobbling them down, asking for seconds, and being totally shocked they were actually *healthy*? That’s when I knew I’d nailed it. These bites prove that you can absolutely have your (Oreo) cake and eat it too, guilt-free!
Why You’ll Love These Healthy No-Bake Oreo Cheesecake Bites
Seriously, these little bites are a game-changer. Here’s why you’re going to be obsessed:
- Super Easy, No Bake! No oven required, which means less fuss and more time chilling with your friends (or just eating them yourself, no judgment!).
- Guilt-Free Indulgence: We’re talking rich, creamy, Oreo-y goodness without all the usual sugar and butter overload. Your taste buds will be singing, and your body will thank you.
- Quick to Whip Up: Got 15 minutes? That’s all you really need to prep these. Perfect for those spontaneous cravings or when company pops over unexpectedly.
- Kid-Approved & Adult-Adored: These little treasures are a hit with everyone. They look fancy enough for a party but are simple enough for a kid’s snack.
Ingredients for Healthy No-Bake Oreo Cheesecake Bites
Okay, let’s talk ingredients! Don’t worry, it’s all super simple and we’re working smarter, not harder, to make these guilt-free. Everything you need to make these Healthy No-Bake Oreo Cheesecake Bites come together is pretty standard, but the little details are key!
For the Crust
- 1/4 cup butter, melted
- 12 Oreos, finely chopped (I like to pop them in a zip-top bag and bash them with a rolling pin – it’s SO satisfying!)
For the Filling
- 7 Oreos, chopped (these are for little bursts of cookie goodness inside!)
- 8 oz cream cheese, softened (this is important, trust me! Let it sit on the counter for about an hour
- 1/2 cup powdered sugar
- 1 teaspoon vanilla extract
- 1 cup heavy whipping cream
For the Topping
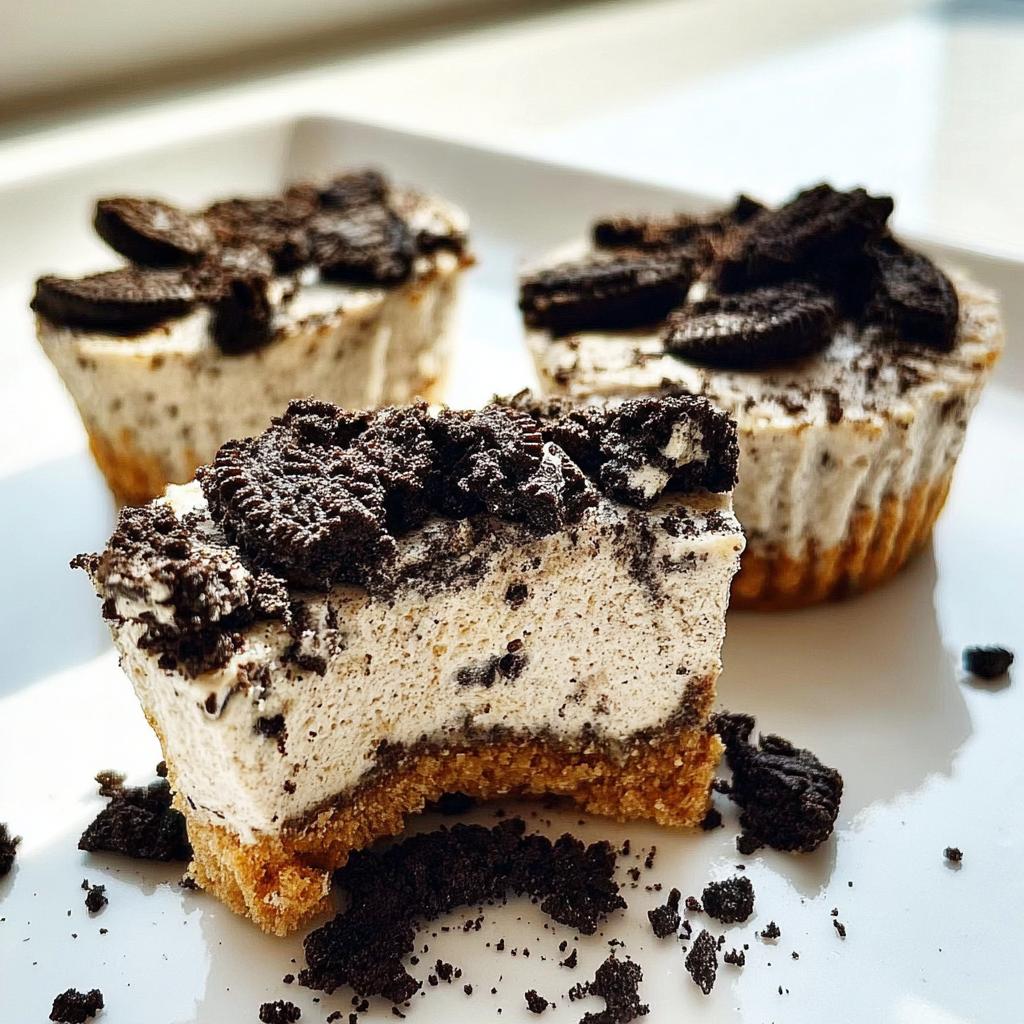
- 5 Oreos, chopped (for that final, pretty sprinkle!)
Equipment Needed for Your Healthy No-Bake Oreo Cheesecake Bites
You won’t need a whole lot of fancy gadgets for these! Most of these things are probably already in your kitchen. For these yummy Healthy No-Bake Oreo Cheesecake Bites, you’ll want:
- A food processor to get those Oreos nice and crumbly for the crust and filling.
- A standard cupcake tray.
- Some cupcake liners so they don’t stick and look super cute!
- Basic measuring cups and spoons, of course!
- A good old-fashioned spoon for pressing down the crust and mixing in the filling.
How to Make Healthy No-Bake Oreo Cheesecake Bites: Step-by-Step
Alright, time to get down to business and make some magic happen! These Healthy No-Bake Oreo Cheesecake Bites are surprisingly simple, and trust me, the payoff is HUGE. Just follow these easy steps, and you’ll be well on your way to dessert heaven.
First things first, let’s get those Oreos prepped. Grab your trusty food processor. We’re going to pulse about 5 of the Oreos until they’re nicely chopped – these are for our topping later, so set them aside in a small bowl. Next, do the same with another 7 Oreos, but keep these handy for the filling. Finally, finely chop the remaining 12 Oreos in the food processor. These are going to form our yummy crust!
Now, for that crust! Take your finely chopped Oreos and mix them with that melted butter. Give it a good stir until everything is nicely combined. Grab your cupcake tray and line it with 12 liners. Spoon an equal amount of the Oreo-butter mixture into each liner and press it down firmly. I like to use the bottom of a measuring cup or a spoon to get it nice and flat – this makes for a perfect base.
On to the filling! In the same food processor (no need to wash it!), combine your softened cream cheese, powdered sugar, vanilla extract, and heavy whipping cream. Zip it all up until it’s super smooth and creamy. Oh, and don’t forget those 7 chopped Oreos from earlier – gently fold them into the cream cheese mixture with a spoon. You want those little cookie bits to be noticeable!
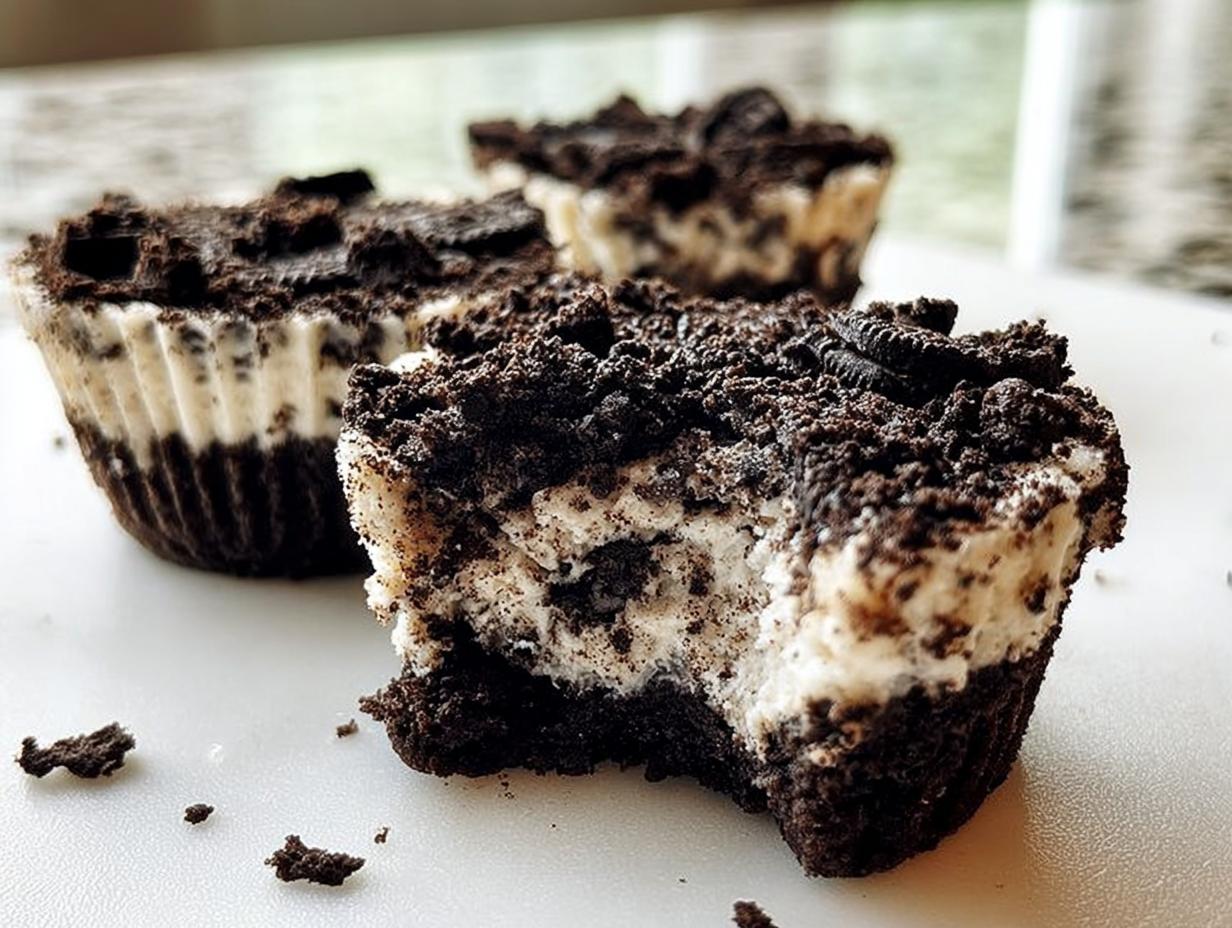
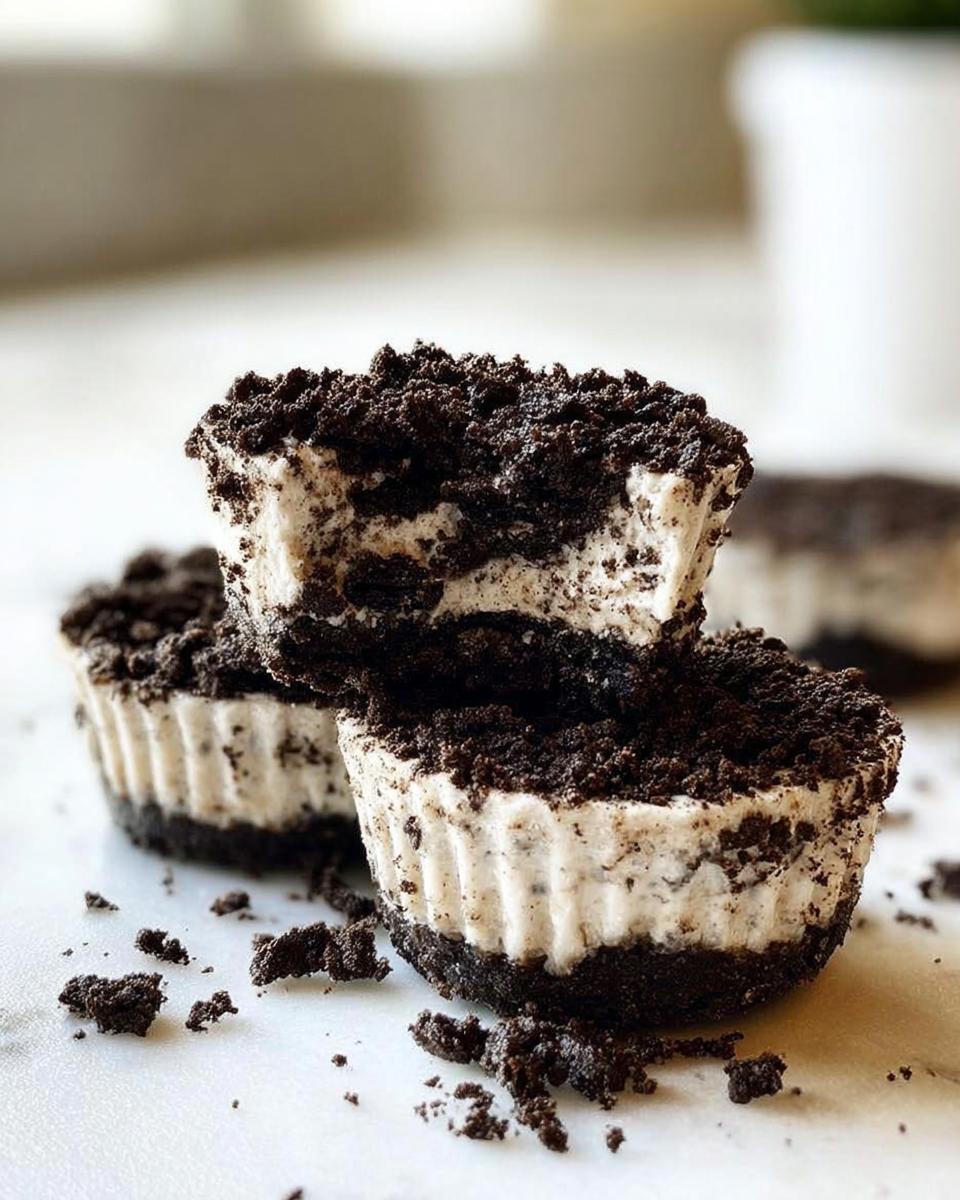
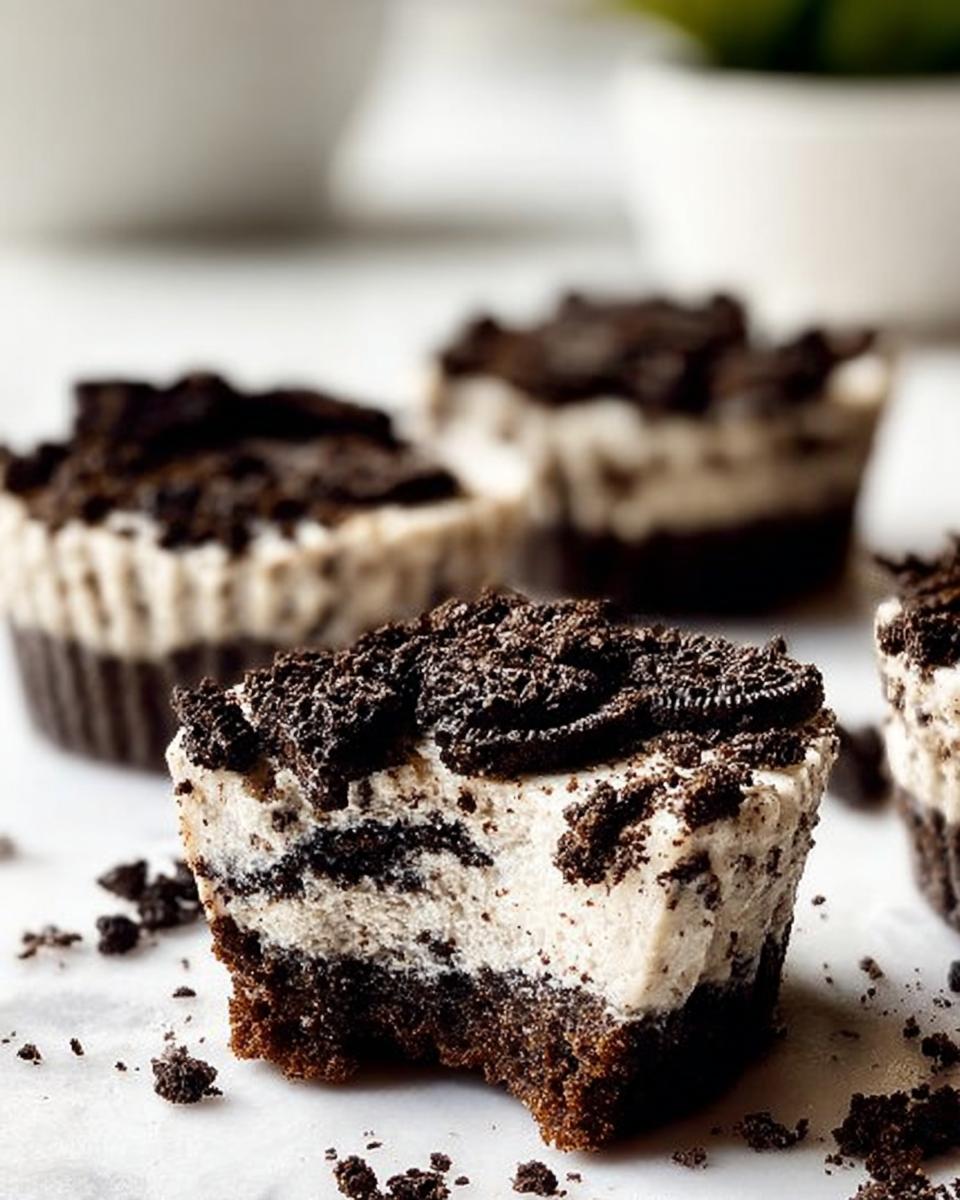
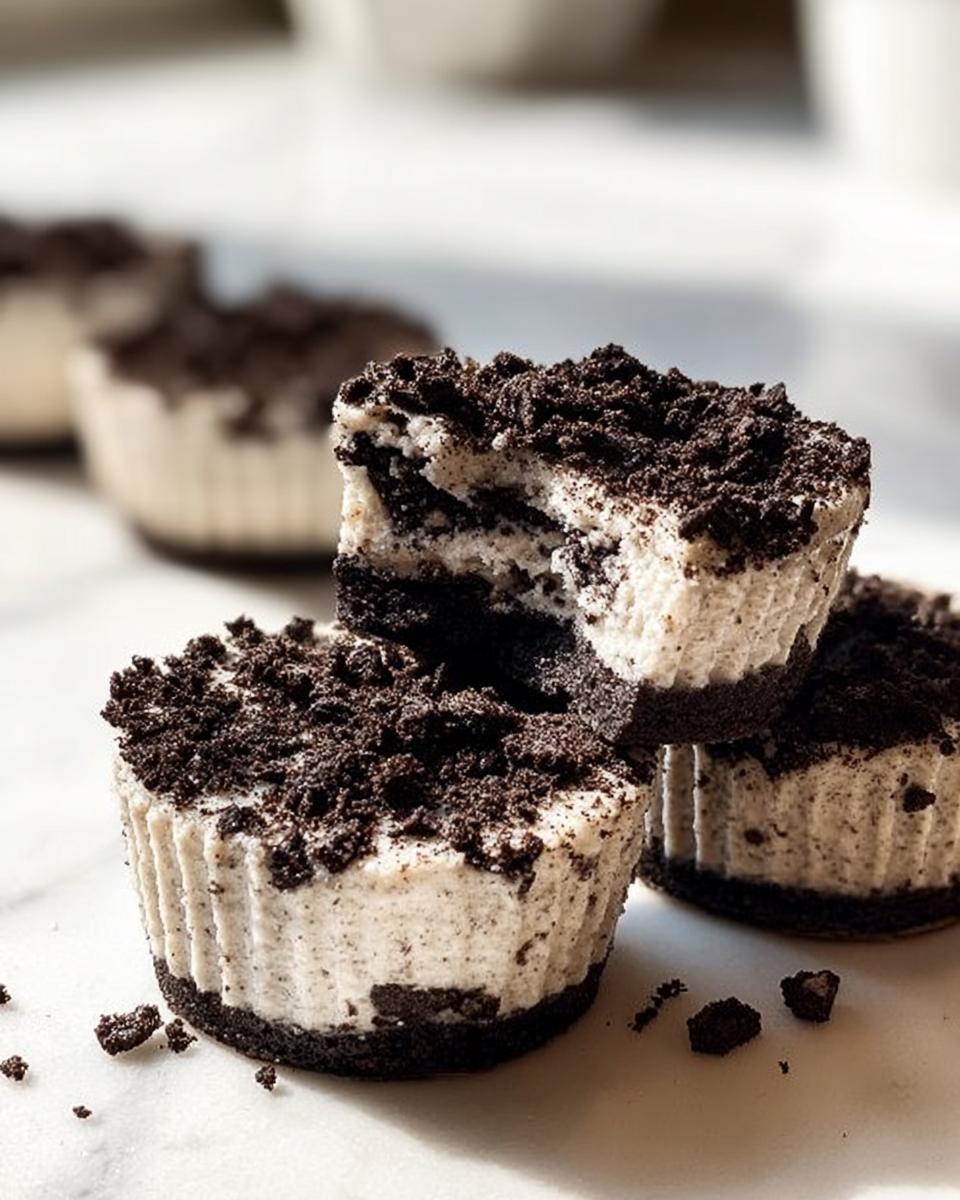
Now for the fun part: assembling! Spoon that luscious cream cheese mixture right on top of the Oreo crusts in each liner. Try to get an even amount in each one. Finally, sprinkle those reserved 5 chopped Oreos over the top of each bite. So pretty! Pop the whole tray into the refrigerator and let them chill for at least an hour. This gives them time to set up perfectly. You can check out how to create a low-carb meal plan if you’re looking for more healthy options to pair with these!
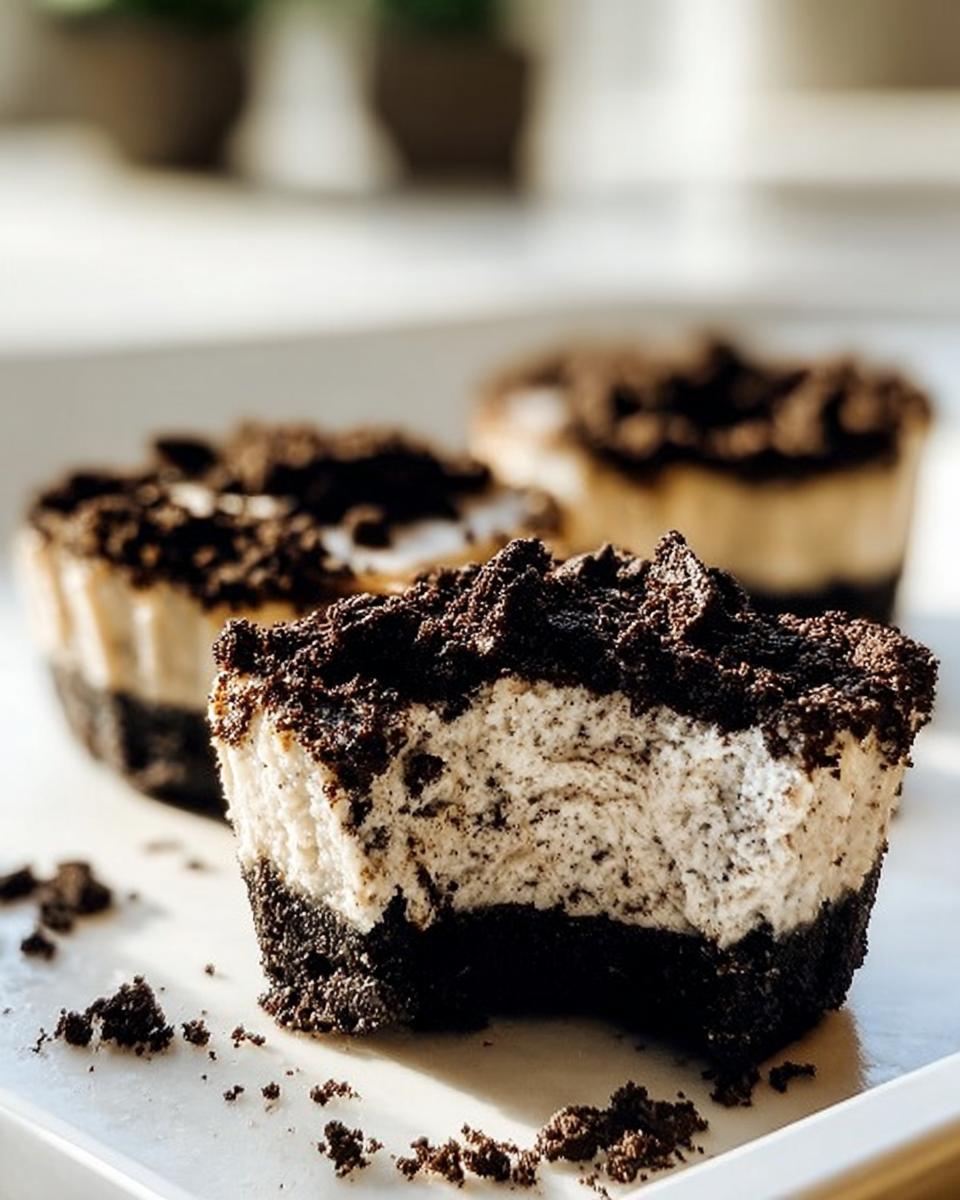
And voilà! You’ve got yourself a batch of delicious Healthy No-Bake Oreo Cheesecake Bites. If you want to see another amazing take on this, check out this recipe for inspiration!
Tips for the Best Healthy No-Bake Oreo Cheesecake Bites
Want to make sure your Healthy No-Bake Oreo Cheesecake Bites are absolutely perfect every single time? I’ve got a few tricks up my sleeve that make all the difference! First off, that softened cream cheese? It’s non-negotiable! If it’s too cold, you’ll end up with lumps, and nobody wants that. Let it sit on the counter for a good hour before you start mixing. Also, make sure your heavy whipping cream is nice and cold – that’s key to getting it whipped up nice and fluffy for that dreamy filling. For presentation, I sometimes like to just let the chopped Oreos fall naturally on top, but for a super neat look, give the tray a little gentle tap on the counter before they go into the fridge so the topping settles evenly. Little touches like these make your bites look as amazing as they taste!
Ingredient Notes and Substitutions
So, let’s talk about making these Healthy No-Bake Oreo Cheesecake Bites work for *you*! I know sometimes you might be missing an ingredient or have specific dietary needs. For the cream cheese, make sure it’s good and soft – that’s really the most important thing for a smooth filling. If you’re looking for a vegan spin, you could totally try using a vegan cream cheese alternative and maybe a different cookie for the crust, though it might change the texture a bit. And for the Oreos themselves, classic is best here, but if you find a lower-sugar or even a gluten-free version that you love, go for it! Just remember that using different kinds of cookies might slightly alter the flavor and sweetness, but that’s part of the fun of experimenting in the kitchen, right?
Serving and Storing Your Healthy No-Bake Oreo Cheesecake Bites
These little gems are just begging to be served chilled! Pop them out of their liners when you’re ready to dive in. They look absolutely adorable on a platter, maybe with a few extra chocolate shavings on top if you’re feeling fancy. And storing them? Super easy! Just pop them right back into their cupcake tray or an airtight container and keep them in the fridge. They stay wonderfully fresh for about 3-4 days. If you’re like me and love to have a healthy treat on hand for any occasion, these freeze like a dream! Just make sure they’re fully set, then transfer them to a freezer-safe container, and they’ll be good for up to a month. Thaw them in the fridge overnight when that craving strikes!
Frequently Asked Questions about Healthy No-Bake Oreo Cheesecake Bites
Got questions about these delightful Healthy No-Bake Oreo Cheesecake Bites? I’ve got answers! Let’s dive into some common queries I get:
Can I make these vegan?
You totally can! For a vegan version, you’ll want to use vegan cream cheese and a plant-based whipping cream alternative. For the crust and filling, look for vegan Oreo-style cookies or sandwich cookies. They might taste a little different since the texture and ingredients will vary, but it’s definitely doable and still super yummy! If you need more info on vegan baking, check out my contact page for resources.
What kind of Oreos are best to use?
Honestly, classic Oreos are what I grew up with and what I usually reach for because they give that signature flavor and texture. However, if you’re watching sugar or carbs, or have dietary restrictions, there are some fantastic lower-sugar or even gluten-free versions out there now that work pretty well! Just make sure they’re finely chopped or crumbled for the crust and chunky for the filling.
How long do these Healthy No-Bake Oreo Cheesecake Bites last?
These little bites are pretty forgiving! Stored in an airtight container in the refrigerator, they should stay delicious for about 3 to 4 days. If you want them to last even longer, pop them in the freezer. They freeze beautifully for up to a month. Just thaw them in the fridge overnight when you’re ready for a treat!
Can I make these without a food processor?
Absolutely! If you don’t have a food processor, no worries! You can easily crush the Oreos by placing them in a sturdy zip-top bag and using a rolling pin or even the bottom of a heavy pan. Just give them a good whack until they’re finely crushed for the crust and chunky for the filling. It’s a great way to get some of your kitchen stress out, too!
Nutritional Information
Just a friendly reminder that this is an estimate, and the exact nutritional values for these Healthy No-Bake Oreo Cheesecake Bites can vary depending on the specific brands of ingredients you use. But generally, each bite comes in at around 240 calories. It’s a pretty great trade-off for such a decadent-tasting treat, right?
Healthy No-Bake Oreo Cheesecake Bites
Ingredients
Equipment
Method
- In a food processor, roughly chop 5 Oreos and set aside for the topping.
- In a food processor, roughly chop 7 Oreos and set aside for the filling.
- In a food processor, finely chop 12 Oreos and set aside for the crust.
- Melt the butter. Mix the melted butter with the 12 finely chopped Oreos.
- Line a cupcake tray with 12 cupcake liners. Fill each liner with an equal amount of the butter and Oreo mixture. Press down to flatten using a measuring cup or spoon.
- In a food processor, combine the cream cheese, powdered sugar, vanilla extract, and heavy cream. Mix until thoroughly combined.
- Hand mix in the 7 chopped Oreos into the cream cheese mixture.
- On top of the Oreo crust, fill the 12 cupcake liners with equal amounts of the creamy Oreo mixture.
- Top with the remaining 5 chopped Oreos.
- Refrigerate for 1 hour. These also freeze well.
Nutrition
Notes
Tried this recipe?
Let us know how it was!
James Richardson – Certified Budget Nutrition Economist
My expertise in affordable low-carb eating was born from necessity during graduate school, when ramen noodles threatened to derail both my metabolism and my economics dissertation. Later, feeding a family of five on a teacher’s salary while my wife completed nursing school taught me that eating well doesn’t require a trust fund.
With my MBA in consumer behavior analytics, I treat grocery budgets like investment portfolios. My breakthrough “Dollar-Per-Day Keto” challenge proved sustainable low-carb eating could be achieved for under $30 weekly per person through strategic bulk purchasing and what I call “ingredient arbitrage” – buying versatile basics when they’re cheapest.
I’ve developed over 200 budget-optimized recipes with real-time pricing calculations that adjust based on regional grocery data. Unlike lifestyle bloggers who assume unlimited budgets, my meal plans work with food stamp restrictions, dollar store ingredients, and the reality that consistent access to “right” foods often determines dietary success.
My background as a budget coordinator for a regional food bank taught me how economic constraints intersect with nutritional needs. When I’m not playing competitive chess or collecting vintage calculators, I’m proving that nutrition becomes a luxury only when you approach it backwards – optimize for value instead of convenience, and eating well becomes the most economical choice.