Oh boy, is it TUESDAY? That means one glorious thing: Taco Tuesday! My absolute favorite night of the week, hands down. Forget boring weeknight meals, we’re talking about a fiesta in your mouth, and guess what? I’ve cooked up something super special just for you. Welcome toThe Ultimate Taco Tuesday Recipes Guide for Beginners! Seriously, if you’ve ever felt a little intimidated by making tacos from scratch, fear not! This guide is all about showing you just how easy and ridiculously delicious homemade tacos can be. I remember when I first started cooking, the idea of making anything more complex than toast felt daunting, but tacos? They were my gateway drug to loving the kitchen. I’d always relied on those dusty old store-bought kits, you know? But then, one Tuesday, I decided to dive in headfirst and my world changed. Now, I get to share that joy with you!
Why You’ll Love This Ultimate Taco Tuesday Recipes Guide for Beginners
Seriously, why wouldn’t you want to dive into this? Here’s the lowdown on why this guide is your new best friend for Taco Tuesdays:
- Super Easy to Follow: Even if your cooking skills are, well, let’s just say “developing,” you can totally nail these recipes. I break everything down so it makes perfect sense!
- Flavor Explosion: Forget bland! We’re talking authentic, mouth-watering flavors that’ll make you feel like you’re at a cantina in Mexico.
- Beginner-Approved: I’ve tested these recipes with total newbies in mind. No fancy techniques, just pure deliciousness made simple.
- Taco Tuesday Tradition Maker: Get ready to impress everyone (including yourself!) and make Taco Tuesday a seriously cherished tradition in your home.
Birria Tacos: Your First Step in The Ultimate Taco Tuesday Recipes Guide for Beginners
Okay, so for your first foray intoThe Ultimate Taco Tuesday Recipes Guide for Beginners, we’re diving right into something truly special: Birria Tacos! Now, I know what you might be thinking – “Birria? That sounds a bit fancy for a beginner!” But trust me on this one. While the flavor is incredibly rich and authentic, the process is totally manageable. It’s one of those recipes that feels super impressive when you serve it, but honestly, it’s more about patience than complicated steps. This is one of those recipes that just *feels* like a celebration, and making it myself always fills my kitchen with the most amazing aromas. It’s become a go-to for when I want to make Taco Tuesday feel like a real event, and I can’t wait for you to experience it too!
Gather Your Ingredients for Birria Tacos
Alright, let’s get our shopping list sorted so we can make these amazing Birria tacos! Don’t worry if some of the chiles sound a bit unfamiliar; we’ll chat about them in a bit. The most important thing is to have everything ready to go so the cooking process is super smooth.
For the Birria
- 5 dried guajillo chiles
- 3 dried morita chiles
- 3 dried pasilla chiles
- 2 lb. beef brisket or beef chuck roast
- 2 lb. oxtails, short ribs, or beef shank
- Kosher salt
- Freshly ground black pepper
- 2 Tbsp. vegetable oil
- 3 Roma tomatoes, halved
- 6 garlic cloves
- 10 whole cloves
- 1 (3-inch) cinnamon stick
- 1/4 cup white wine vinegar
- 1 1/2 tsp. cumin seeds
- 1 tsp. dried oregano
- 1 large yellow onion, quartered
- 5 bay leaves
For Assembly
- 6 (6-inch) corn tortillas
- Shredded Oaxaca or mozzarella cheese (a good handful per taco!)
- Chopped white onion
- Chopped fresh cilantro
- Lime wedges
Essential Equipment for The Ultimate Taco Tuesday Recipes Guide for Beginners
Okay, before we get our hands messy with these amazing Birria tacos, let’s make sure you’ve got the right gear! Having these tools handy makes all the difference, honestly. First up, you’ll need a trusty Dutch oven. It’s perfect for giving that beef all the slow-cooked love it deserves. Then, a blender is a must for whipping up that super flavorful chile paste – just make sure it’s a sturdy one! And for getting those tortillas perfectly crispy and golden, a cast-iron skillet is your best friend. It holds heat like a champ!
Step-by-Step Instructions for Birria Tacos
Alright, let’s get cooking! This is where the magic happens. Don’t get intimidated; just follow these steps, and you’ll be chowing down on some incredible birria tacos before you know it. It’s all about building those deep flavors, layer by delicious layer.
Preparing the Birria Base
First things first, preheat your oven to 350°F. Grab your big, heavy pot or Dutch oven and pop it over medium heat. Toss in those dried guajillo, morita, and pasilla chiles. Toast them up for about 2 to 3 minutes, just until they start smelling amazing and a little softened. Keep stirring so they don’t burn! Now, carefully scoop those toasted chiles into a heatproof bowl. Pour boiling water over them, use a little plate to keep them submerged, and let them soak for at least 20 minutes until they’re nice and pliable. While those are softening, grab your beef brisket or chuck roast and the oxtails or whatever yummy bone-in cuts you picked. Season them generously with salt and pepper. Heat up your oil in that same pot over medium-high heat. Brown the beef really well on all sides – this step is crucial for flavor! Work in batches if needed, you don’t want to crowd the pot. Once browned, set the beef aside on a plate.
Blending the Flavorful Paste
Time to make our flavor bomb! Into your blender go those lovely rehydrated chiles. Add about 1 1/2 cups of the chile soaking liquid (drain off the rest), those halved Roma tomatoes, garlic cloves, whole cloves, that cinnamon stick, white wine vinegar, cumin seeds, and dried oregano. Blend it all up until you have a nice, smooth, pourable paste. If it seems too thick, just add a tiny bit more of that chile liquid. Easy peasy!
Simmering and Shredding the Beef
Okay, back to the pot! Put that browned beef back in, along with the quartered onion and bay leaves. Pour in that gorgeous chile paste you just made. Now, add just enough water to barely cover the beef – we don’t want it swimming! Give it a good pinch of salt and bring it all to a gentle simmer right on the stovetop. Once it’s simmering, cover the pot tightly with its lid and carefully transfer it to your preheated oven. Let it bake for about 4 to 4 1/2 hours. You’ll know it’s ready when the beef is super tender and falls apart easily with a fork. Once it’s done, carefully take the pot out. Discard the bay leaves and onion. Transfer the cooked beef to a cutting board. Shred it all up with two forks – it should be incredibly tender! Don’t toss that delicious broth – that’s your consomé, gold! Taste it and season with salt and pepper. If it seems too thick, you can thin it out with a little water or stock. Just a heads-up, there will be a beautiful layer of red oil on top, that’s exactly what we want!
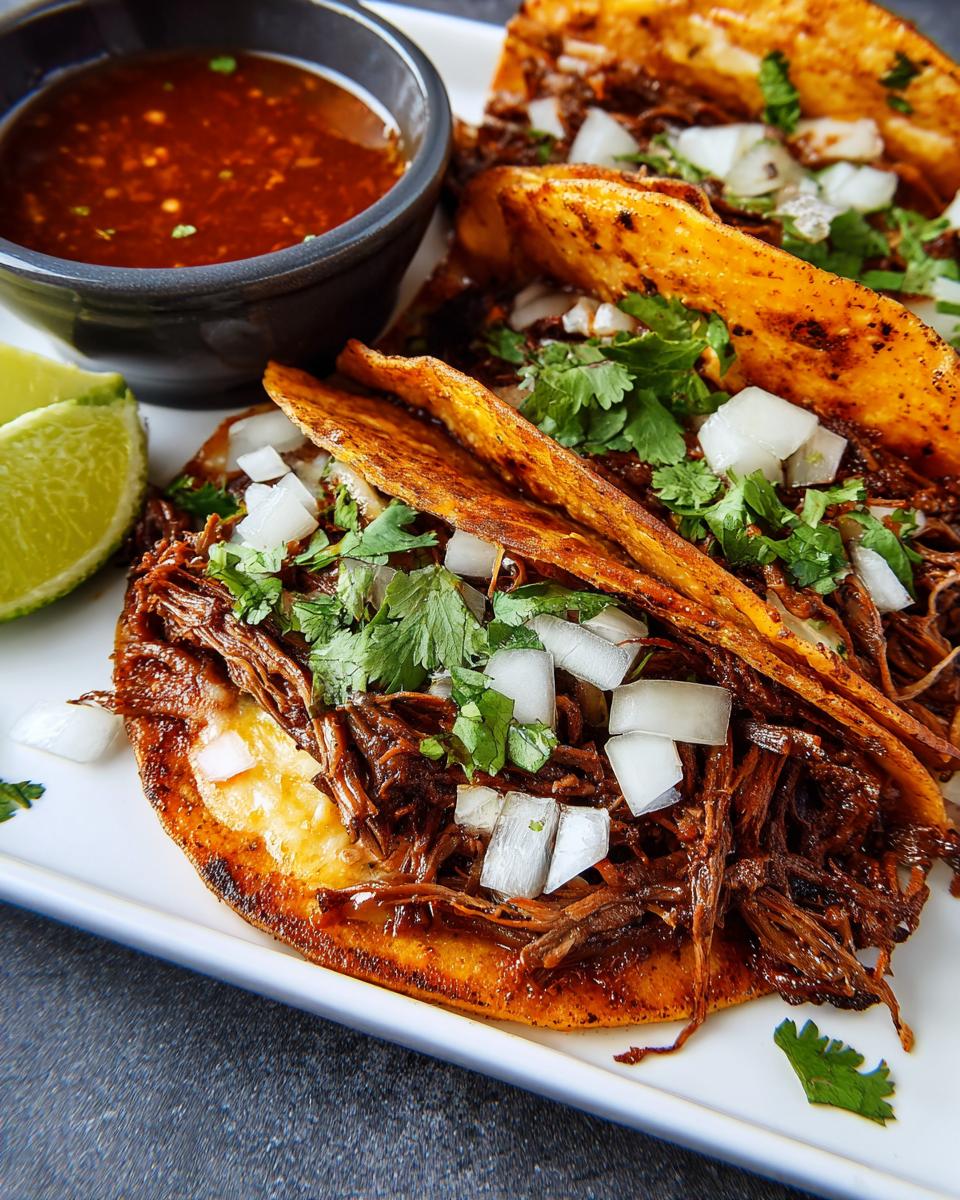
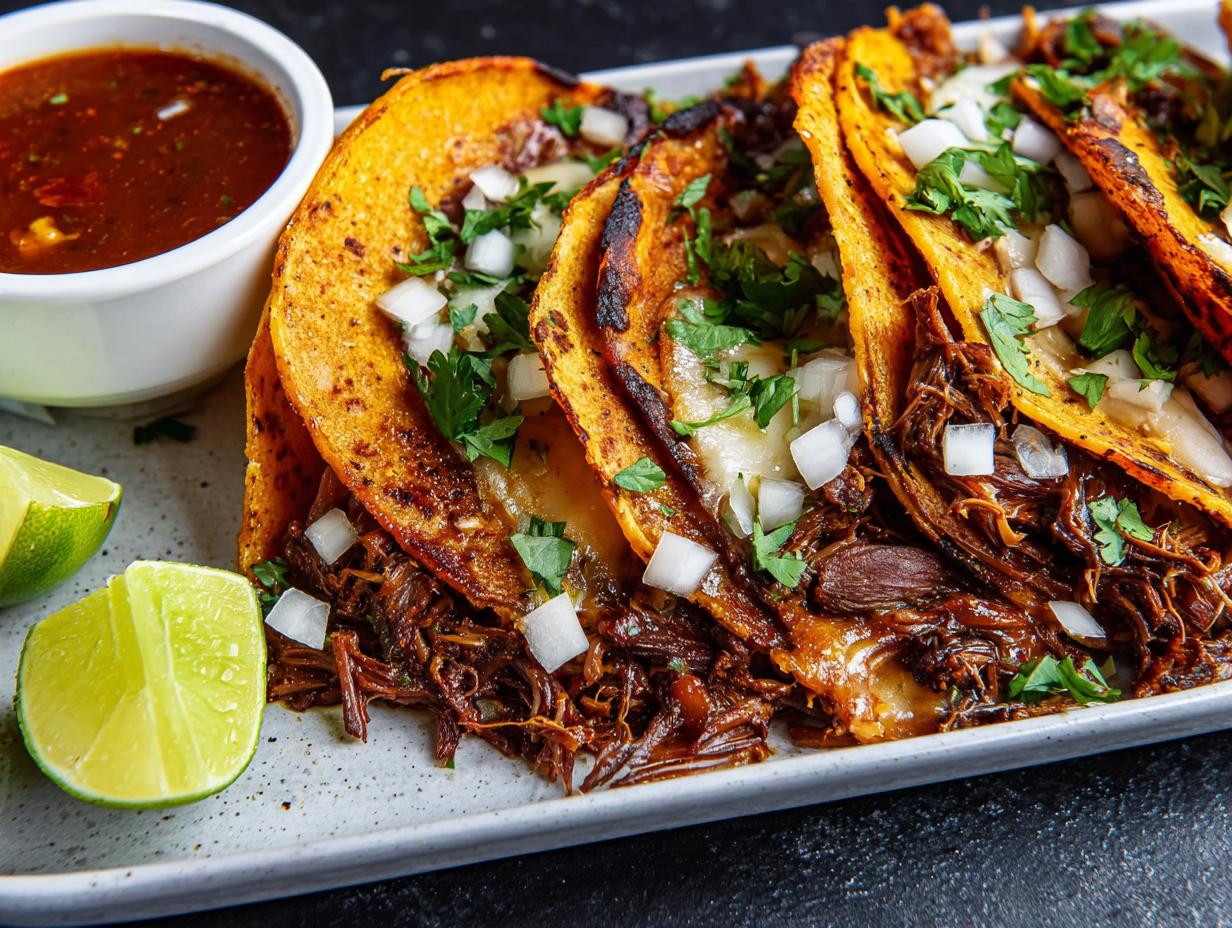
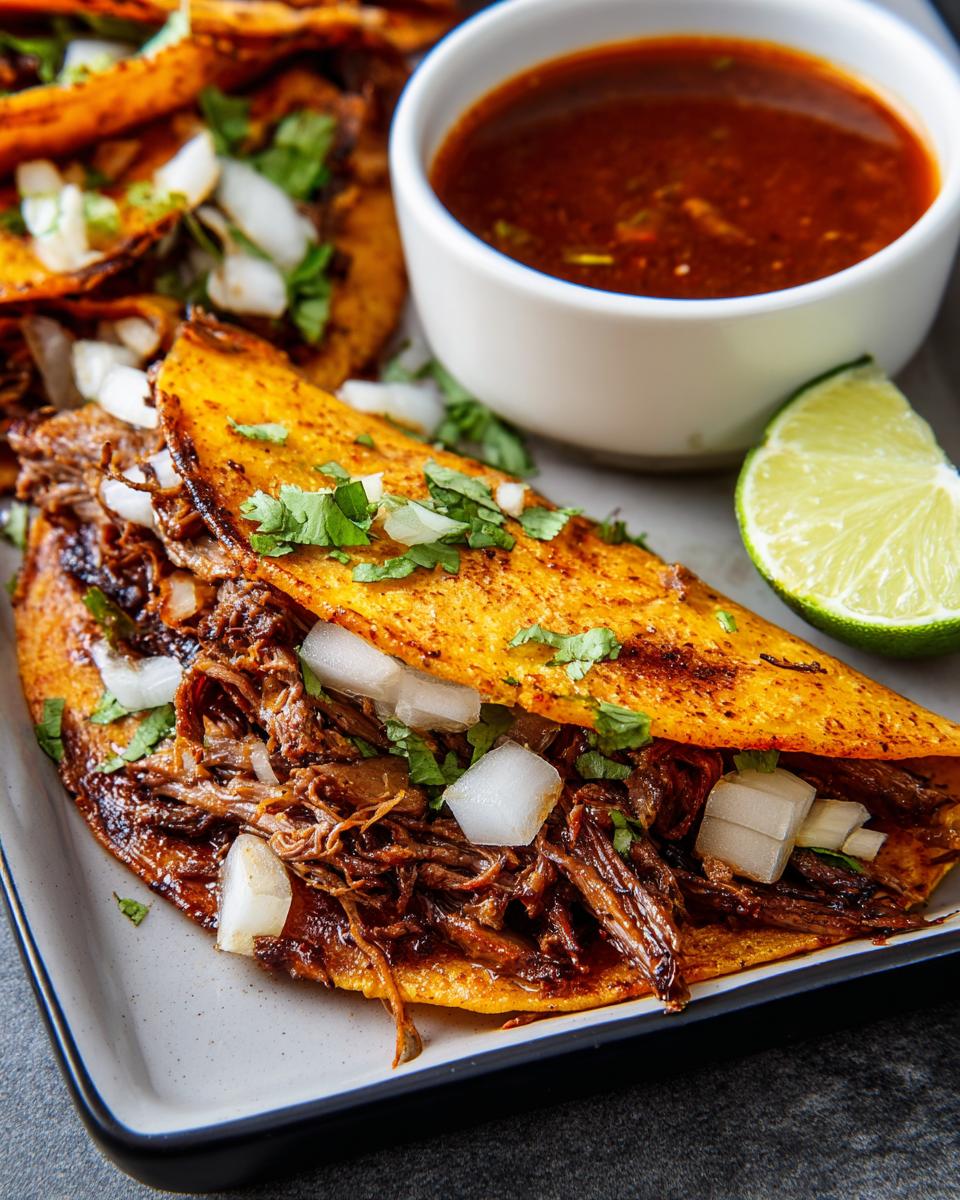
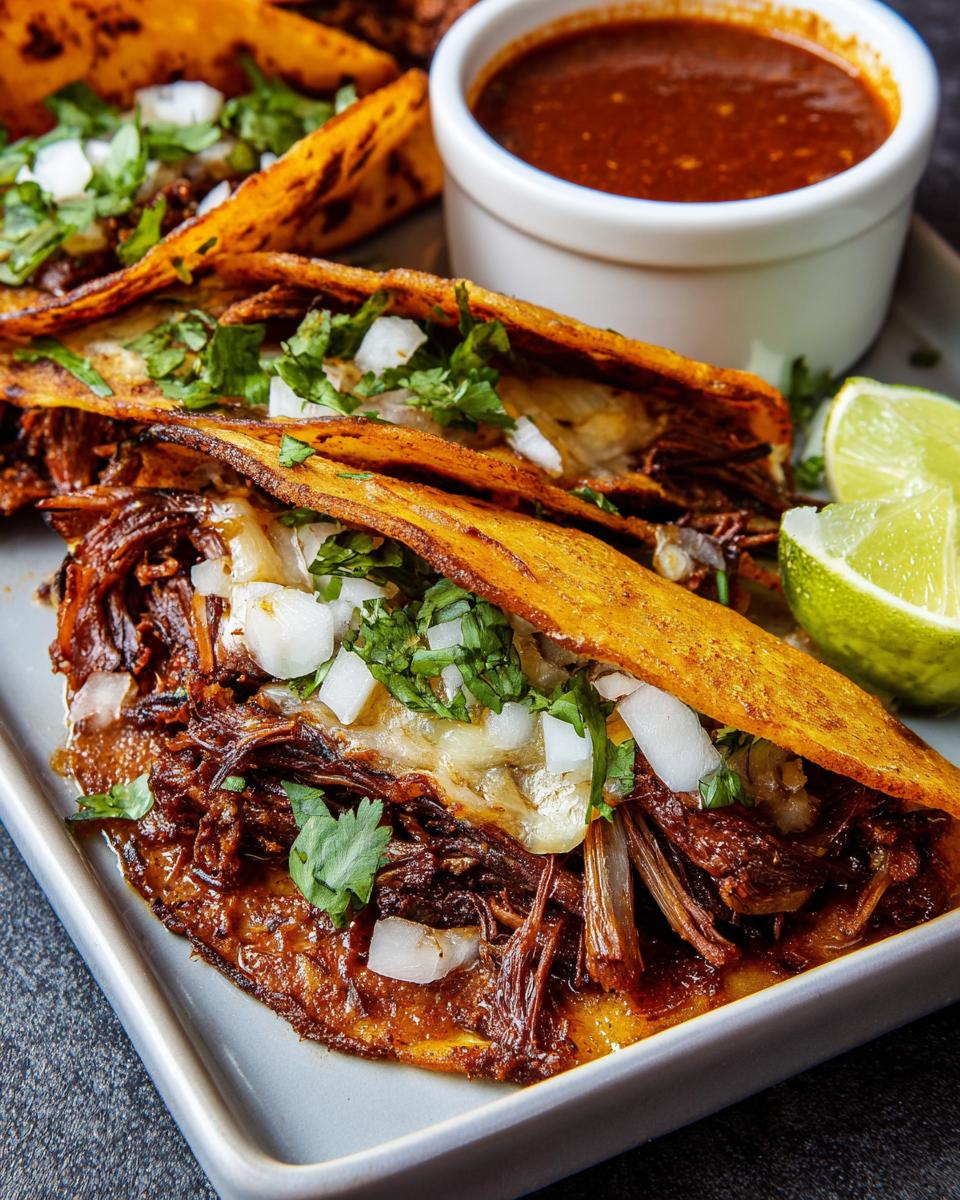
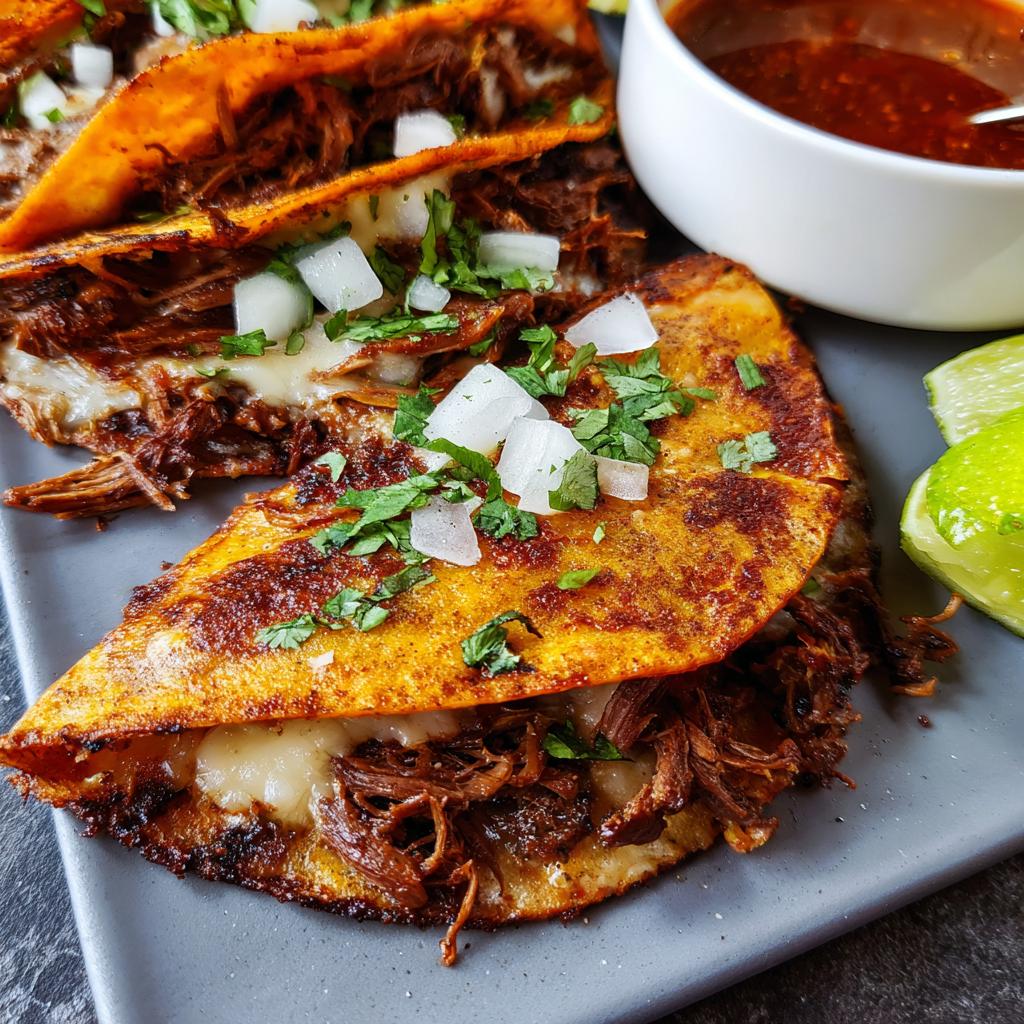
Assembling and Frying Your Tacos
Now for the grand finale! Get your taco station ready. Put the consomé back in the pot over low heat, just barely simmering – you want that oily sheen on top. Heat up your cast-iron skillet or a flat griddle over medium heat. Get a plate of your shredded birria beef ready, and have your corn tortillas nearby. Grab a tortilla, dip it really quick into that shimmering consomé, coating both sides. Lay it flat in the hot skillet. Sprinkle a generous amount of shredded cheese right onto the tortilla. Let it fry for about 3 minutes until the cheese is mostly melted and the bottom is getting nice and golden and crispy. Now, place some of that delicious shredded beef on one half of the tortilla, and top it with chopped onion and cilantro. Fold that tortilla in half to make your taco. Let it crisp up for another 30 seconds per side in the skillet. Repeat with the rest of your beef and tortillas. You’re almost there!

Serve these beauties immediately with those lime wedges and little bowls of the extra consomé for dipping. Trust me, you’ll want to dunk every single bite!
For more easy taco inspiration, check out these other simple taco recipes.
Tips for Success with The Ultimate Taco Tuesday Recipes Guide for Beginners
Alright, home cooks! You’re on your way to making some seriously amazing birria tacos. To make sure you get perfect results every single time, here are a few little secrets from my kitchen to yours. First off, don’t be shy with those chiles! The variety in guajillo, morita, and pasilla gives you this deep, smoky, slightly sweet flavor without being overwhelmingly spicy. If you’re worried about heat, just remove the seeds and membranes before toasting. Also, that beautiful red oil on top of the consomé? That’s pure flavor gold! Don’t skim it off; it’s what makes the tacos so rich and delicious. Dipping your tortillas in it is non-negotiable for that authentic crispy, chewy texture. For more quick tips on making meal prep a breeze, check out these 15 quick keto hacks that can really speed things up in the kitchen. Trust me, these little details make all the difference in making your Taco Tuesday truly unforgettable.
Ingredient Notes and Substitutions
Okay, let’s talk ingredients, because sometimes the less common ones can throw you for a loop! Those dried chiles? Guajillo, morita, and pasilla are the heart of that amazing birria flavor. If you can’t find them, don’t panic! You can often find dried chile blends at specialty stores, or try using a mix of good quality ancho chiles (which are dried poblanos) and maybe a pinch of chipotle powder for that smoky heat. For the beef, brisket or chuck roast are fantastic because they have enough fat to get super tender. If you can’t find those, a nice cut of beef shank would work wonderfully too. You can also use a good quality stew beef, though it might take a little longer to get that fork-tender texture. The key is patience and a love for good food!
Make-Ahead and Storage for Your Taco Tuesday
Let’s be real, sometimes Taco Tuesday needs a little prep-ahead magic! The best part about this birria recipe is that it actually gets better if you make it a day or two in advance. You can totally make the beef and the consomé up to 5 days ahead of time. Just pop them into separate airtight containers and stash them in the fridge. It makes those weeknight taco cravings SO much easier to handle! For some awesome ideas on how to get ahead of the game, you should totally check out these low-carb meal prep ideas that take just 2 hours – it’ll give you some great strategies for saving time in the future!
Frequently Asked Questions about Birria Tacos
Can I use a different cut of beef for birria tacos?
Absolutely! While brisket or chuck roast are fantastic because they have great fat content for tenderness, you can totally use other cuts. Beef shank is a great option, or even stew meat if that’s what you have on hand. Just be aware that some cuts might take a little longer to get super fork-tender, so keep an eye on it. The goal is melt-in-your-mouth beef!
How spicy are birria tacos, really?
That’s a great question! Birria itself isn’t usually super spicy. The heat comes from the morita chiles, and if you toast them without seeds and membranes, it mellows out a lot. The flavor is more deep, rich, and complex than it is fiery hot. If you like things hotter, you can always add a dash of your favorite hot sauce or some jalapeños when you assemble your tacos. It’s all about personal preference!
My consomé looks really oily, what should I do?
Don’t panic! That red oil on top is a good thing; it’s packed with flavor from the chiles and the beef! For the most authentic birria tacos, you actually want some of that oil. When you dip your tortillas, they get that gorgeous color and richness. If it seems like *too* much, you can always skim a little off the top before you start assembling, but I’d recommend leaving most of it! For some nifty-difty meal planning tips that might help you organize your cooking process, check out this guide to creating a low-carb diet meal plan – it’s got great strategies for busy cooks!
Can I make the birria paste ahead of time?
You sure can! The chile paste base is something you can totally whip up the day before you plan to cook the birria. Just blend it all up, put it in an airtight container, and store it in the fridge. It makes getting the birria into the oven a little quicker when you’re ready to start the longer cooking process. Having things prepped always makes cooking feel way less stressful, right?
Estimated Nutritional Information
Alright, let’s talk numbers! Keep in mind these are just estimates per serving, and they can totally change depending on the exact cuts of beef you use, how much oil you end up using, and the brands of ingredients. But generally, you’re looking at something like:
- Calories: Around 500-600 kcal
- Fat: 30-40g
- Protein: 40-50g
- Carbohydrates: 15-25g (mostly from the tortillas and chiles)
It’s a hearty meal, for sure, but so, so worth it!
Share Your Taco Tuesday Creations!
Okay, so you’ve made it! You’ve conquered the Birria Tacos and officially leveled up your Taco Tuesday game. I am SO excited for you! Now, I wanna hear ALL about it. Did they turn out amazing? Did you try any fun little tweaks? Please, leave a comment below and let me know how your taco adventure went! And if you snapped any drool-worthy pics, tag me on social media – I’d absolutely love to see your creations! For any questions or to just say hi, you can also reach me via my contact page. Happy cooking!
Birria Tacos
Ingredients
Equipment
Method
- Preheat oven to 350ºF. In a large, heavy pot or Dutch oven over medium heat, toast guajillo, morita, and pasilla chiles, stirring frequently, until softened and fragrant, 2 to 3 minutes.
- Transfer chiles to a medium heatproof bowl, then cover with boiling water. Using a small plate or bowl, completely submerge chiles. Let soak until rehydrated and pliable, about 20 minutes.
- Meanwhile, generously season brisket and oxtails with salt and pepper. In the same pot over medium-high heat, heat oil. Working in batches, cook beef, turning occasionally, until browned on all sides, 6 to 7 minutes per side for brisket/roast, 4 to 5 minutes for bone-in parts. Transfer to a plate or cutting board.
- In a blender, blend chiles, 1 1/2 cups chile liquid, tomatoes, garlic, cloves, cinnamon, vinegar, cumin, and oregano, adding more chile liquid if needed, until a pourable paste forms, about 1 minute.
- Return beef to pot and add onion, bay leaves, and chile paste. Pour in enough water to just cover beef; season with a heavy pinch of salt. Bring to a simmer over medium heat.
- Remove from heat, cover, and bake until beef is fork-tender, 4 to 4 1/2 hours. Discard bay leaves and onion, transfer beef to a cutting board, and reserve broth (or consomé). Shred beef with 2 forks.
- Taste consomé; season with salt and pepper. Depending on your preference, to thin out consomé, add water or chicken or beef stock until desired consistency is reached.
- In the same large pot over medium-low heat, bring consomé to a bare simmer (there should be a layer of dark red-looking fat/oil on top).
- Construct a taco station: Have the consomé simmering on one burner, a large cast-iron skillet or plancha heated over medium heat on another, a plate of shredded beef from the birria and another plate of tortillas to the side, as well as small bowls filled with Oaxaca cheese, onions, and cilantro.
- Working in batches, reheat 1/3 cup beef on one side of cast-iron skillet, leaving enough room for a tortilla, tossing occasionally, until seared and browned. Take a tortilla and dip into consomé, coating both sides with dark red fat. Place tortilla on cast-iron skillet next to beef and cover with cheese. Fry tortilla until cheese is mostly melted and underside has browned and started to crisp, about 3 minutes.
- Place seared meat on one half of tortilla and top with onion and cilantro. Fold tortilla into a taco and cook until crisp, about 30 seconds per side. Repeat with remaining beef.
- Serve tacos with lime wedges and small bowls of consomé for dipping alongside.
Notes
Tried this recipe?
Let us know how it was!
Certified Therapeutic Nutrition Specialist
My journey into medical low-carb nutrition began when my four-year-old daughter was diagnosed with epilepsy. When neurologists recommended the Modified Atkins Diet as seizure management, I found myself in uncharted territory where recipe failures could literally trigger neurological episodes.
As a registered nurse with pediatric experience, I had the clinical knowledge but needed to learn how to translate medical protocols into family-friendly meals. I spent three years documenting every successful adaptation and breakthrough that made medical nutrition feel less like punishment and more like nourishment for our family’s unique needs.
I’ve developed over 190 medically-compliant recipes, each tagged with precise macro calculations and detailed notes about which health conditions benefit most. My collaboration with pediatric neurologists at Children’s Hospital of Philadelphia resulted in the first comprehensive cookbook for families managing childhood epilepsy through diet – work that’s now used by three major children’s hospitals.
When I’m not reading medical journals or practicing violin for stress relief, I’m advocating for insurance coverage of medical foods and helping school districts accommodate students on prescribed ketogenic protocols. Medical nutrition isn’t about perfection – it’s about precision applied with compassion.